Scalding Flour
Back in 2019 I participated in the Kneading Conference in Skowhegan Maine as a work study volunteer. It was at the session led by Daniel DeRosier who is the owner of Boulangerie des Rosiers in Notre-Dame-de-l’Île-Perrot, Quebec that I discovered the technique. He demonstrated how scalding a percentage of flour, particularly flour with low gluten content, would result in a much improved loaf. It was a game changer for me.
“Oh my goodness, you are adding really hot water to the flour? I can’t believe that would work” I exclaimed.
Are you keen to use different flours in your bread? You might be tempted by rye, barley or gluten free grains such as buckwheat. Or perhaps by ‘heritage’ wheats which are lower in gluten. A particular favourite of mine is oats. However, If you’ve made bread with these different flours in the usual way, you’ll probably have a flat rather dense result.
Scalding flour is suitable for both sourdough and yeasted breads. Adding hot water gelatinises the flour. Once the water is added it stays locked in. You’ll be able to add a higher amount of water as a result adding to the moistness of the loaf. Your bread will have a lighter even crumb and it appears to keep longer.
You may have come across the Tangzhong technique where fat, flour and water are cooked together to form a sort of roux. The resulting bread is very light and airy and the hydration of the dough is increased. Scalding flour is an even simpler way of increasing the hydration and flavour of your loaf.
How much flour to scald?
As a good starting point, allow 20% of the total weight of flour. For example, I might be using 500 grams of flour in total. I’d use 100 grams of barley to scald, and the remainder would be organic white flour.
What about hydration?
Once you’ve scalded your flour, you now need to think about how much water you’ll add to the remaining flour. After experimentation, I find that adjusting the hydration of the remaining dough by half the amount of water added to your scalded flour works really well. For example
- Total flour weight 800 gr (a mix of 80% white (640 gr) and 20% barley flour (160gr)
- 160 gr of the barley flour is scalded by adding 160 ml hot water and is mixed well. Rather than reduce 560 ml by the 160 ml used for the barley flour. I take away half the amount of water used to scald (80 ml).
- The hydration for 800 gr dough is 70% = 560 ml
- So I need to add 480 ml water to the remaining 640 gr flour.
When I add the scalded flour to rest of the flour, I have in fact used 480 + 160 ml water which is a total of 80% hydration. Read more about Baker’s percentages
Once you’ve used the scalding method a few times, you might like to experiment with adding more water in the initial soak. You’ll find different grains absorb different amounts of water.
Creating your scalded loaf
When you are ready to knead, add the salt and mix well. I generally use a mixer, so start the mix on a low speed with your autolysed mix. Add your scalded flour bit by bit, in lumps. It will gradually mix in. Increase the speed to medium and keep mixing until the dough reaches between 24 and 26C. The dough will be lovely and stretchy. If it is a little firm, this is the point to add more water. Add 20 ml at a time until you have the right consistency – still stretchy but a little softer.
Prove your dough in the usual way. I like to leave my yeasted dough overnight as I might sourdough. Shape in the morning and prove for an hour. If you’re using a dutch oven or cast iron casserole dish, pre heat for at least 1/2 hour.
Place your dough onto baking parchment, score the top once and lower into the dish. Replace the lid. Remove the lid after 25 minutes and bake for a further 10 minutes.
If you’re baking without a dish, ensure you have plenty of steam in the oven and bake for 35 minutes, checking that the internal temperature is in excess of 93C.
Scalded Flour Recipe
The amount of sourdough starter in this recipe is correct, 30% of flour weight. You can of course adapt your yeast recipe to add scalded flour – use the same 20% as mentioned.

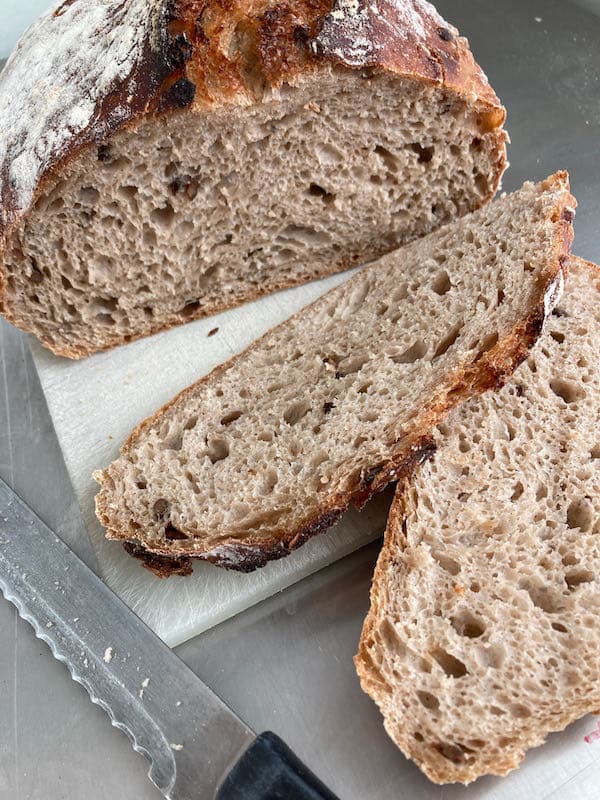
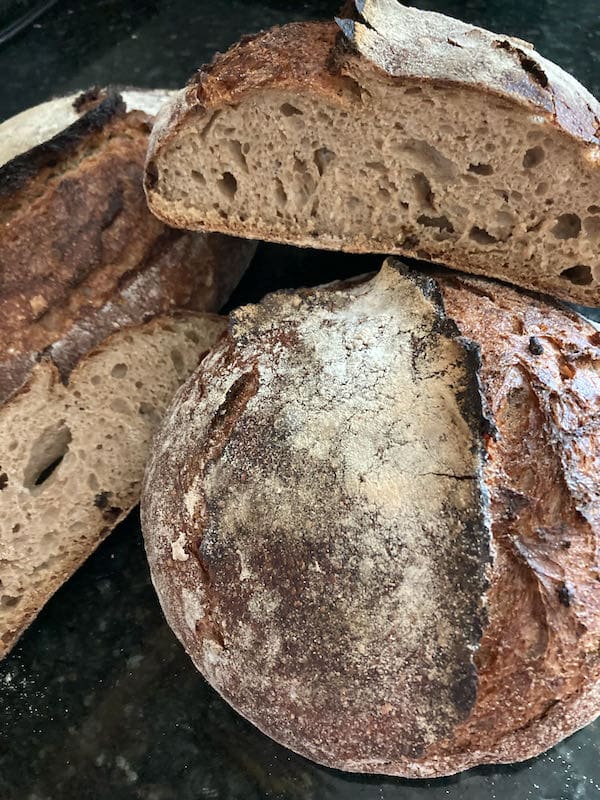
Barley Sourdough Bread
Equipment
- Cast iron pan/ Dutch oven with lid at least 23cm wide
- Digital scales
- Dough scraper
- Lame
- Stand mixer
- Large box to store dough in fridge
Ingredients
- 640 grams white bread flour eg Shipton Mill Organic no 4
- 160 grams barley flour Or other flour mentioned above
- 240 millilitres sourdough starter
- 640 millilitres water
- 12 grams salt
Instructions
Scalding the flour
- Boil water in a kettle and let it sit for 5 minutes. You'll be using 160 ml
- Add the slightly cooled water to the barley flour and mix well

- Set aside until cooled. Check temperature is less than 30°C (86°F) before using.
Autolysing the dough
- Add the white flour to a bowl. Add the scalded barley flour breaking up into small pieces. Add the starter and 480 ml water. This should be about 22°C (71°F). Mix together and leave for 3 hours at room temperature.

Mix and Knead the dough
- Add the salt to the autolysed mixture and mix well. Using a stand mixer, knead until the dough reaches between 24° and 26°C (75° to 78°F). Start on a low speed for about 5 minutes, then increase speed to medium. The dough should come away from the sides cleanly. Check that the dough is elastic by pulling a lump gradually apart. Checking the dough temperature is very important. This will set you up for successful dough.
- Alternatively, knead for 10 to 15 minutes until smooth and the dough is stretchy. The dough should ideally be between 24° and 26°C (75° to 78°F)
First Proving at Room Temperature
- Move the dough to a large plastic box and leave it to prove for 3 hours at room temperature.
Fold the dough
- During the first proving, fold the dough twice. Imagine that the dough in the bowl has four equal sides. Using our dough scraper, pull up each side in turn and fold towards the middle.
Prove the dough in the fridge
- After 3 hours place the dough in the fridge overnight.

Shaping the dough
- Divide the dough into two equal portions and shape gently into a round. Leave 10 minutes. If you are only able to bake one loaf at a time, put one portion back into the box in the fridge. Then shape that one hour before your first loaf comes out of the oven.

Pre heat your oven and pan
- Pre-heat your oven to 230°C (445°F) placing your cast iron pans in the oven. Do this at least 1/2 hour before you intend to bake. If you are using a Rofco oven, pre-heating will take 1.5 hours.
Shape and Second Prove
- Shape your loaves a second time and either place them on a couche or in banettons for one hour. If your pan is circular, shape into rounds; if you pan is rectangular shape into oblongs
Prepare parchment paper
- Cut two strips of parchment paper as wide as the loaf and twice as long. You will put your dough on the parchment and place in the cast iron pan.
Transfer your dough
- After one hour, transfer the dough to the parchment paper. If you are using a banetton, place the parchment on top of the dough, then a cutting board and then invert it. If you are using a couche, use the pleat to tip your dough onto the cutting board then invert it onto the parchment.

Score the loaf
- Using a lame or sharp knife, score the loaf horizontally. with a shallow cut on one side half way between the top of the loaf and the bottom.

Bake
- Remove the pan from the oven and remove the lid. Put the loaf into the pan and close the lid immediately.
- Place in the oven and bake for 25 minutes. Then remove the lid and bake for a further 10 minutes. Finally, bake the loaf for 5 minutes out of the pan. Let it cool before eating.

Notes
Bake Better Bread – Using heat and steam
I am sorry to hear that. I honestly don’t think that Einkorn would be any different from any another wheat and would equally cause symptoms. Perhaps gluten free is the way to go, unfortunately I don’t make gluten free bread.
I’m not supposed to eat grains, due to having mold toxicity. I’ve read that while the modern wheat grain is prone to mold, the Einkorn wheat berry has more of a hull that protects it from mold and mycotoxins. I was hoping to try Einkorn recipes so I can enjoy bread again. Thanks
Hi Heather. I haven’t tried it with 100% einkorn. I am curious as to why you’d like to use only that flour? Let me know and I will try and help further
Hello! I just found your site. Thanks for all of the tips. I am new to bread making, so I have a lot to learn. I am interested in making 100% Einkorn bread (due to health reasons). Would the scalding technique work in a recipe with only Einkorn flour? I attempted it using the Jovial bread recipe, scalding 20% of the flour. It pretty much was a failure, but I’m sure that’s on me. Have you used this technique to do a 100% Einkorn bread? Do you have any tips, or a recipe you can share? Thank you!
Always good to hear how the recipe went for you. Sounds a tasty loaf!
Stumbled on your recipe and was intrigued by idea of scalding the barely flour. I made the bread following through bulk
fermentation. I always shape and do the second rise cold. I also made this as one large loaf (1.5kg!) and baked it for 1hr and 5min. In any case, it turned out great, crusty on the outside and very airy for a bread containing whole grain. I’ll be experimenting with some other grains. Thank you!
Hi Carol, There is no difference between millilitres and grams – they are interchangeabl. Don’t worry about volume, just measure! It won’t make any difference if it is stirred.
Here’s to a successful bake!
I bake often with barley flour, but my sourdough loaves need help. This method seems just the ticket, so thank you! One question before I give this recipe a try. You specify starter amounts measured in milliliters. The volume of the starter changes when it’s stirred or manipulated, no? Can you translate the milliliters you show here into grams? I’d like to be certain I’m following your recipe precisely.
Hello Danielle, Thank you for the recipe. My next loaf will be a scald sourdough 25 % rye with 37 % Einkorn and 38 % bread flour. Should i scald 20 % total flour weight ? The rye and einkorn flour? . Example total flour is 1050 grams, so i would scald 210 grams of mixture of rye and einkorn flour? I like to use honey and sesame seeds in my mix. Do you have a Scald sourdough recipe that you can share ? Thank you and the best to you. Mike Kaplan
Hi Joe, Would love to hear how you get on. Just remember that if you scald the barley you might find the dough very soft if you use high hydration. My suggestion would be to start lower (70%) and mix as you would usually, but only then add more if needed!
I received 5 lb of Alaska stone ground barley as a Christmas gift from my daughter in Anchorage. I have made 5 or 6 loaves so far, experimenting with different variables. One thing I know is how Ive fallen in love with the taste and texture of the barley along with whole wheat . I am never going back. I saw your recipe and found myself intrigued. I have tested the Tangzhong method before but mainly with white flour. Tonite I am giving a version of your recipe a test with hydration increased with whole wheat. I will let you know how the scalded barley affects my loaf. Thank you for sharing this
Lovely to hear from you. I have both types of starter and use one or other in a particular bread. I do use some wholemeal, but not 100%. I’d suggest trying with the scalded flour and white to begin with
This sounds interesting and I will try this out when I make my next bread.
So far I have only used the scalding for wheat bran which I folded in after the first rise by paning, but not for the actual flour.
Do you use a wheat or a rye sourdough starter? And do you only use white wheat flour or have you also tried wholemeal?